

You can safely stack combi ovens provided the manufacturer permits it and you use the oven maker’s stacking kit or an approved stand. Follow the model’s installation instructions exactly, use a team lift or mechanical lift, and secure every fastening, vent and drain connection to the manual’s spec. Isolate gas and electrical supplies before touching the unit, and bring in qualified engineers for the final reconnection.
TL;DR:
- Stacking combi ovens requires using manufacturer-approved stacking kits and following exact installation instructions, including secure fastening and proper venting.
- Proper site preparation, such as level flooring, correct support stands, and unobstructed air intakes, is crucial to prevent long-term operational issues.
- Gas units should never be stacked without certified professional reconnection, and electric units are often preferred for safety and simplicity in stacking.
- Confirm kit compatibility with the specific oven model before purchase, and always document installation and safety checks to support warranty and compliance.
- Most stacking failures come from mismatched parts, missed engagement of locating points, blocked airflow, or rushed installation steps.
Table of Contents
- What you need before you start: tools, PPE and site checks
- Step-by-step guide to stacking combi ovens
- Gas or electric: which unit goes on top?
- Levelling, stands and structural support
- Ventilation, air intake and drain routing
- How do you know the stack is safe to switch on?
- Common mistakes that undermine a stacked installation
- When to call the manufacturer instead of guessing
- Getting the right stacking kit and stand from the start
- Sources
- FAQ
What you need before you start: tools, PPE and site checks
Get the preparation wrong and everything after it gets harder. Start by confirming the exact oven model and the matching stacking kit part number. Manufacturers design these kits around specific feet heights, locating points and fastener types, so fitting parts from a different kit or improvising with generic brackets is how installers end up with a stack that looks fine and fails a service call six weeks later.
Once the kit is confirmed, sort your equipment. You will need:
- A team lift or mechanical lift (forklift, pallet truck with support blocks, or a two to three-person team lift depending on unit weight)
- A spirit level, screwdriver or socket set matching the specified fasteners, hose clamps and cut resistant gloves
- Confirmation that the floor is level and rated for the combined load of both units
- Clear air intakes, unobstructed service access, and a lockout/tagout plan naming who isolates gas and electrical supplies
Our guide to combi oven installation requirements covers site-readiness checks in more depth if you are stacking as part of a wider kitchen fit-out.
Pro Tip: Photograph the site before you start, including floor condition and clearances around the intended stack. If the installation gets queried later for warranty or building control reasons, that photo record settles the argument in minutes.
Step-by-step guide to stacking combi ovens
Once the site is ready and the kit is unpacked, the sequence matters as much as the parts. Manufacturer guides for stacking kits follow a broadly similar order, and skipping a step is the most common cause of rework.
- Prepare both units. Remove any service panels the stacking kit instructions specify, and swap the lower unit’s feet if the kit calls for a different height. Locate the stacking base points on the lower oven before you attempt to lift anything.
- Position the lift. If using forks, space them roughly 20 inches apart and insert support blocks as gauges, a detail the Vulcan & Wolf ABC series stacking guide specifies precisely because it reduces the risk of the upper unit shifting mid lift.
- Lift and hold. Keep the oven door closed during the lift and maintain a controlled, slow ascent. This is not a job for one person unless the unit is genuinely light enough, and the CPG stacking kit manual is explicit that a team lift is required, not optional.
- Lower and align. Bring the upper unit down slowly and align its locating feet into the lower unit’s locating holes. Check that vent and flue knockouts on both units line up before you commit to fastening anything.
- Fasten the stack. Insert the specified flange head screws and tighten to the torque given in the manual, or hand tight where the manual states that explicitly. Do not substitute longer or shorter screws because they happen to fit.
- Connect vent and drain. Join the stacked flue assemblies, then attach the drain tube from the upper unit into the tee supplied with the lower unit’s drain flange, securing every joint with hose clamps and checking for kinks.
Each of these steps traces back to guidance in the stacking kit installation manual, and deviating from the order tends to create problems that only surface once the ovens are running.
Gas or electric: which unit goes on top?
There is no universal rule here, and that is precisely the point. Some manufacturers will not permit gas units to be stacked at all without specific approved parts, while others allow it only in defined configurations. Never assume a gas combi oven can sit above or below another unit just because the physical dimensions match. Installers commonly favour stacking electric units together specifically because incorrect gas stacking can create ventilation and regulatory complications that are expensive to unpick later.
Before you touch any utility connection:
- Disconnect power at the isolator and apply lockout/tagout before starting mechanical work.
- Avoid putting strain on flexible gas lines during the lift or once the stack is secured, and check the stack cannot shift and pull on the connection over time.
- Bring in a qualified gas engineer or electrician for final reconnection and testing, and keep the certification of that work on file.
Warranty claims and insurance queries both tend to ask for this paperwork, so treat it as part of the job, not an optional extra.
Levelling, stands and structural support
A stack that is out of level by even a few millimetres at the base compounds into a much bigger problem at the top unit, where rack travel and door clearances are tightest. Level the stand or base unit first, before the second oven goes anywhere near it. Only once that is confirmed should you set and check the feet on the lower oven, matching the entry frame and rack travel clearances given in the manual.
Some kits require a specific feet height change; one common instruction is to switch to 150mm feet for certain ten-tray stacking configurations. Getting this wrong throws off the whole geometry of the stack, not just the top unit’s height.
- Confirm the stand or stacking kit seats correctly on its locating points before fastening.
- Check the floor load rating covers both ovens plus the stand, not just one unit.
- Never store items between the stand and the oven base. It looks like harmless spare space, but it stresses the structure and blocks airflow.
If you need extra clearance for rack access, a taller Unox ultra high stand solves that without compromising the stacking geometry.
Pro Tip: Check level again after fully tightening every fastener, not just before. Torquing screws down unevenly can pull a perfectly level stack slightly out of true.
Ventilation, air intake and drain routing
Blocked airflow is one of the quietest ways to ruin a stacked installation, because the oven will often run for weeks before the fault shows up as inconsistent cooking or overheating. Manufacturer instructions require that the service compartment stays accessible after stacking, and that air intakes are never obstructed by the stand, wall, or nearby equipment.
- Secure intake and exhaust connecting hoses with hose clamps, following the manual’s routing so they cannot interfere with fans or internal baffles.
- Leave the base air intake completely clear. Do not push the stack flush against a wall if that blocks it.
- Route drain tubes into the supplied connection tee, securing every joint with hose clamps and avoiding tight bends that trap food residue or steam condensate over time.
- Check the drain fall is correct. A flat or reverse-sloped drain run will back up eventually, usually during a busy service.
For a wider look at how combi ovens handle extraction, our piece on combi oven ventilation covers when a ventless hood is genuinely enough and when it is not.
How do you know the stack is safe to switch on?
Do not treat commissioning as a formality. Work through it properly, because this is the last checkpoint before the ovens go into daily service.
- Check every fastening and hose clamp is tight, and confirm there are no gaps or play at the interface between the upper and lower units.
- Reinstall any insulation panels removed during fitting, then run the full electrical test sequence and cycle through the oven’s functions per the manual, watching for warning lights or fault codes.
- For gas units, carry out leak detection on every joint and confirm the gas line sits without stress even when the stack is fully loaded. Secure the stack to the wall or floor if the kit specifies it, and document every test result for warranty and compliance records.
Keeping that documentation is not box ticking. It is the single fastest way to resolve a warranty dispute if something does go wrong months later.
Common mistakes that undermine a stacked installation
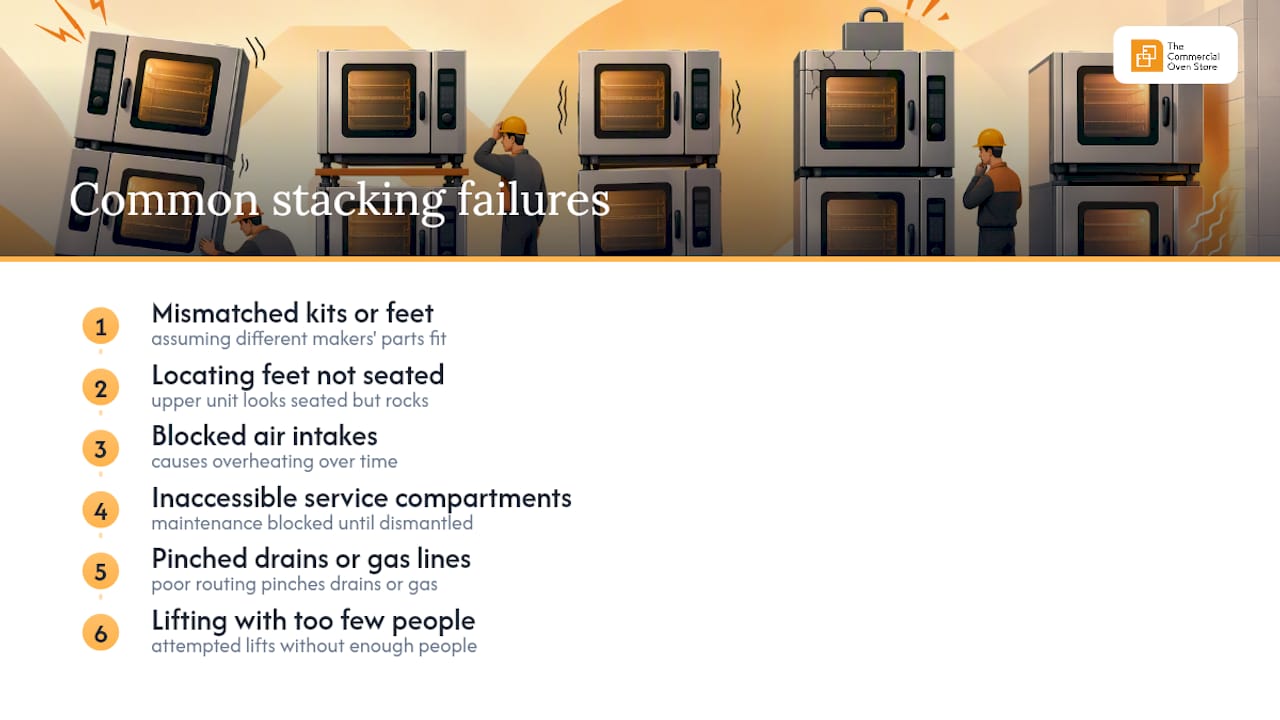
Most stacking failures trace back to a handful of repeat offenders. Mismatched kits or feet heights top the list, usually because someone assumed one manufacturer’s parts would fit another model closely enough. Missing locating engagement is a close second: the upper unit sits close enough to look right, but the locating feet never actually seated into the holes, so the whole stack rocks under vibration.
Blocked air intakes and inaccessible service compartments cause slower, quieter damage, showing up as overheating or a maintenance visit that cannot proceed until the stand is partially dismantled. Pinched drains, poorly routed gas lines and lifts attempted with too few people round out the list. None of these are complicated to avoid; they are simply the steps people skip when they are in a hurry.
When to call the manufacturer instead of guessing
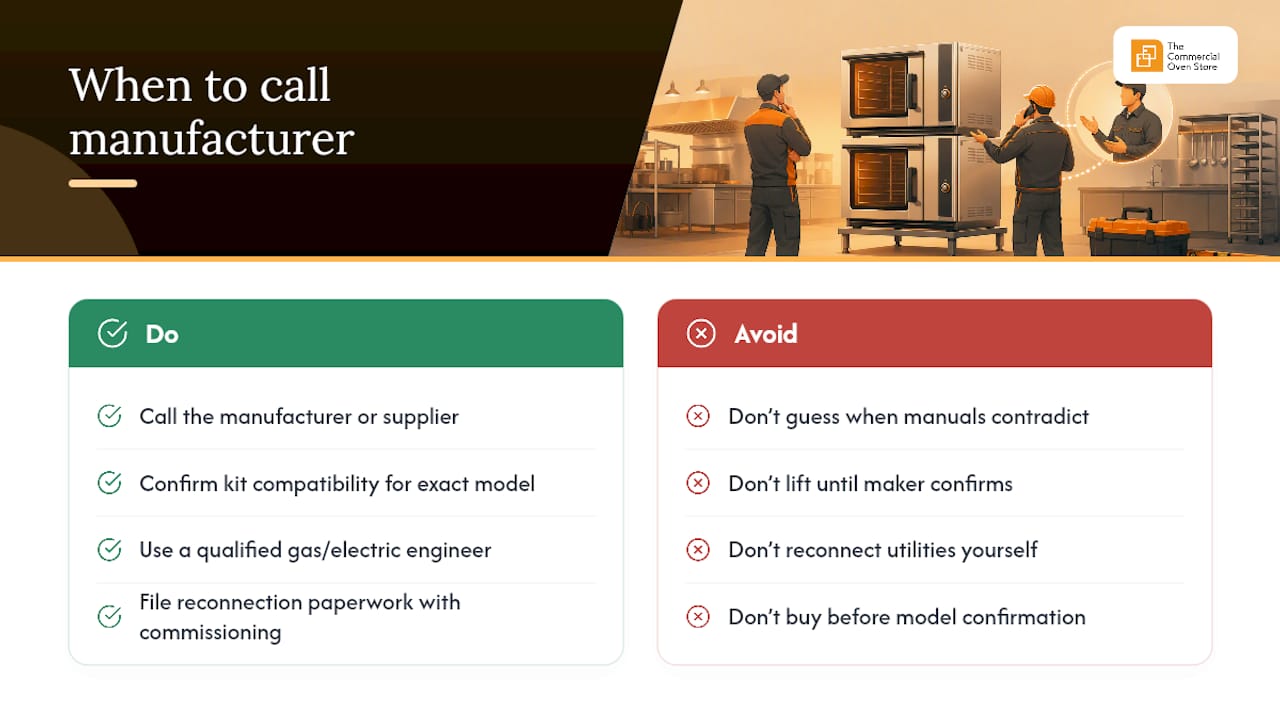
If two manuals seem to contradict each other, or you are not certain a specific gas model is approved for stacking, stop and contact the oven maker or your supplier before lifting anything. That single phone call is cheaper than an unstacked oven, a damaged unit, or a failed gas safety check.
Any utility reconnection work needs a qualified gas engineer or electrician, full stop, and the paperwork from that work should go in the same file as your commissioning records. Suppliers can also confirm stacking-kit compatibility against the exact model numbers before you buy, which avoids the far more expensive problem of discovering a mismatch after installation day.
— Simon
Getting the right stacking kit and stand from the start
Most stacking problems trace back to one decision made before any lifting happens: buying the wrong kit for the model. Some suppliers stock manufacturer-compatible stacking kits, approved stands and combi ovens built for stacked configurations, so you can order parts that your model actually needs, not a close-enough substitute.

Beyond the hardware, our team gives model-specific advice before you commit to a purchase, and iwocaPay lets you spread the cost of ovens and installation kits rather than paying the full amount upfront. If you are planning a stacked setup, browse the double stack installation kit for 460x330 ovens or get in touch with your model numbers and we will confirm kit compatibility before you order, saving you the cost of a return. Start by checking your oven’s specification against the full range at Thecommercialovenstore.
FAQ
Can you put two single ovens on top of each other?
Only if both units and the stacking kit are approved by the manufacturer for that combination. Stacking two ovens that were never designed to sit together risks unstable locating points, blocked vents, and a voided warranty.
What are the downsides of a combi oven?
Combi ovens need proper ventilation, level installation, and regular servicing access, which can complicate placement in tight kitchens. Stacked configurations add extra requirements around feet height, drain routing, and service compartment access that a single freestanding unit does not have.
Can you have two ovens on the same circuit?
This depends entirely on the electrical load of each unit and your circuit’s rated capacity, so it needs sign off from a qualified electrician rather than a general rule. Stacked electric combi ovens often draw enough combined current to need a dedicated circuit rather than sharing an existing one.
Can you have a double oven and microwave together?
Domestic double oven and microwave combinations are a different setup from commercial combi oven stacking and follow different manufacturer rules entirely. For commercial kitchens, stick to the stacking kit and clearance guidance specified for your combi oven model rather than assuming domestic appliance rules apply.